如何在 Ubuntu 22.04/23.04 上安装 Zen Cart
Zen Cart 是一款免费的开源电子商务应用程序,具有广泛的社区支持。它是用 PHP 编写的,需要 MySQL 数据库。
在本教程中,我们将向您展示如何在 Ubuntu 22.04 操作系统上安装 Zen Cart。
步骤 1:更新操作系统
使用以下命令将您的Ubuntu 22.04 操作系统更新 到最新版本:
$ sudo apt update && sudo apt upgrade -y第 2 步:安装 Apache 网络服务器
apt 您可以通过执行以下命令通过包管理器安装它。
$ sudo apt install apache2您可以通过输入以下命令启动 Apache 服务并将其配置为在启动时运行:
$ sudo systemctl start apache2
$ sudo systemctl enable apache2
Apache 使用 命令验证服务的状态 systemctl status :
$ sudo systemctl status apache2输出:
● apache2.service - The Apache HTTP Server
     Loaded: loaded (/lib/systemd/system/apache2.service; enabled; vendor preset: enabled)
     Active: active (running)
       Docs: https://httpd.apache.org/docs/2.4/
   Main PID: 47636 (apache2)
      Tasks: 55 (limit: 2200)
     Memory: 4.8M
        CPU: 126ms
     CGroup: /system.slice/apache2.service
             ├─47636 /usr/sbin/apache2 -k start
             ├─47638 /usr/sbin/apache2 -k start
             └─47639 /usr/sbin/apache2 -k start
第 3 步:为 Zen Cart 安装 PHP 和 PHP 扩展
默认情况下,Ubuntu 22.04 附带 PHP 8.1 版。要安装 PHP 和其他 PHP 模块以支持 Zen Cart,请运行以下命令:
$ sudo apt-get install php php-cli php-common libapache2-mod-php php-curl php-zip php-gd php-mysql php-xml php-mbstring php-json php-intl验证是否安装了 PHP。
php -vOutput:
PHP 8.1.2-1ubuntu2.9 (cli) (built: Oct 19 2022 14:58:09) (NTS)
Copyright (c) The PHP Group
Zend Engine v4.1.2, Copyright (c) Zend Technologies
with Zend OPcache v8.1.2-1ubuntu2.9, Copyright (c), by Zend Technologies
安装所有包后,编辑 php.ini 文件:
$ sudo nano /etc/php/8.1/apache2/php.ini根据您的要求更改以下设置:
memory_limit = 512M
post_max_size = 128M
upload_max_filesize = 128M
date.timezone = America/Chicago
要实施更改,请重新启动 Apache 网络服务器:
$ sudo systemctl restart apache2第四步:安装MariaDB并创建数据库
要安装 MariaDB,请运行以下命令:
$ sudo apt install mariadb-server mariadb-clientMariaDB 使用 命令验证服务的状态 systemctl status :
$ sudo systemctl status mariadb输出:
● mariadb.service - MariaDB 10.6.11 database server
     Loaded: loaded (/lib/systemd/system/mariadb.service; enabled; vendor preset: enabled)
     Active: active (running)
       Docs: man:mariadbd(8)
             https://mariadb.com/kb/en/library/systemd/
    Process: 59747 ExecStartPre=/usr/bin/install -m 755 -o mysql -g root -d /var/run/mysqld (code=exited, status=0/SUCCESS)
    Process: 59748 ExecStartPre=/bin/sh -c systemctl unset-environment _WSREP_START_POSITION (code=exited, status=0/SUCCESS)
    Process: 59750 ExecStartPre=/bin/sh -c [ ! -e /usr/bin/galera_recovery ] && VAR= ||   VAR=`cd /usr/bin/..; /usr/bin/galera_recovery`; [ $? -eq 0 ]   && >
    Process: 59790 ExecStartPost=/bin/sh -c systemctl unset-environment _WSREP_START_POSITION (code=exited, status=0/SUCCESS)
    Process: 59792 ExecStartPost=/etc/mysql/debian-start (code=exited, status=0/SUCCESS)
   Main PID: 59779 (mariadbd)
     Status: "Taking your SQL requests now..."
      Tasks: 9 (limit: 2200)
     Memory: 61.0M
        CPU: 415ms
     CGroup: /system.slice/mariadb.service
             └─59779 /usr/sbin/mariadbd
默认情况下,MariaDB 未加固。您可以使用 mysql_secure_installation 脚本保护 MariaDB。
$ sudo mysql_secure_installation像这样配置它:
- Set root password? [Y/n] Y
- Remove anonymous users? [Y/n] Y
- Disallow root login remotely? [Y/n] Y
- Remove test database and access to it? [Y/n] Y
- Reload privilege tables now? [Y/n] Y
现在运行下面的命令登录到 MariaDB shell。
$ sudo mysql -u root -p登录到数据库服务器后,您需要为 Zen Cart 安装创建一个数据库:
MariaDB [(none)]> CREATE DATABASE zencart;
MariaDB [(none)]> CREATE USER 'zencart'@'localhost' IDENTIFIED BY 'Str0ngWedrf1';
MariaDB [(none)]> GRANT ALL PRIVILEGES ON zencart. * TO 'zencart'@'localhost';
MariaDB [(none)]> FLUSH PRIVILEGES;
MariaDB [(none)]> exit;
第 5 步:下载 Zen Cart
最新版本的 Zen Cart 可从 GitHub 下载。在编写本教程时,可用的最新版本是 1.5.8。
$ sudo wget https://github.com/zencart/zencart/archive/refs/tags/v1.5.8.zip --no-check-certificate然后使用以下命令将文件解压缩到文件夹 /var/www/中:
$ sudo apt -y install unzip
$ sudo unzip v1.5.8.zip -d /var/www/
重命名提取的目录:
$ sudo mv /var/www/zencart-1.5.8 /var/www/zencart/然后为 Apache 网络服务器用户启用访问这些文件的权限:
$ sudo chown -R www-data:www-data /var/www/zencart/第 6 步:为 Zen Cart 配置 Apache
运行以下命令以 zencart 在 /etc/apache2/sites-available/ 目录中创建一个名为的新 VirtualHost 文件。
$ sudo nano /etc/apache2/sites-available/zencart.conf粘贴内容如下图:
 <VirtualHost *:80>
    ServerAdmin [email protected]
    DocumentRoot /var/www/zencart/

    ServerName your-domain.com
    ServerAlias www.your-domain.com

    <Directory /var/www/zencart/>
        Options FollowSymLinks
        AllowOverride All
        Order allow,deny
        Allow from all
    </Directory>

    ErrorLog /var/log/apache2/your-domain.com-error_log
    CustomLog /var/log/apache2/your-domain.com-access_log common

 </VirtualHost>
请记住替换 your-domain.com 为您的服务器的域名。
保存并退出配置文件。
要启用此站点,请运行以下命令:
$ sudo a2ensite zencart.conf要实施更改,请重新启动 Apache 网络服务器:
$ sudo systemctl restart apache2第 7 步:安装免费的 Let’s Encrypt SSL 证书
首先我们需要安装用于创建 Let’s Encrypt 证书的Certbot 客户端:
$ sudo apt install certbot python3-certbot-apache要使用 Certbot 获取 SSL 证书,请键入以下命令:
$ sudo certbot --apache -d your-domain.com -d www.your-domain.com如果成功获取SSL证书,certbot会提示配置成功:
IMPORTANT NOTES:
 - Congratulations! Your certificate and chain have been saved at:
   /etc/letsencrypt/live/your-domain.com.com/fullchain.pem
   Your key file has been saved at:
   /etc/letsencrypt/live/your-domain.com/privkey.pem
   Your cert will expire on 2023-04-02. To obtain a new or tweaked
   version of this certificate in the future, simply run certbot
   again. To non-interactively renew *all* of your certificates, run
   "certbot renew"
 - Your account credentials have been saved in your Certbot
   configuration directory at /etc/letsencrypt. You should make a
   secure backup of this folder now. This configuration directory will
   also contain certificates and private keys obtained by Certbot so
   making regular backups of this folder is ideal.
 - If you like Certbot, please consider supporting our work by:

   Donating to ISRG / Let's Encrypt:   https://letsencrypt.org/donate
   Donating to EFF:                    https://eff.org/donate-le
现在,您已经成功地在您的网站上安装了 SSL。
第 8 步:访问 Zen Cart Web 界面
打开您的 Web 浏览器并键入 URL https://your-domain.com/zc_install/index.php。您应该会看到以下页面:
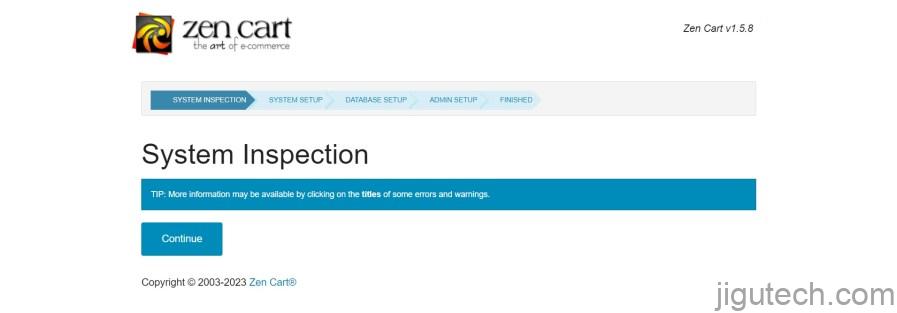
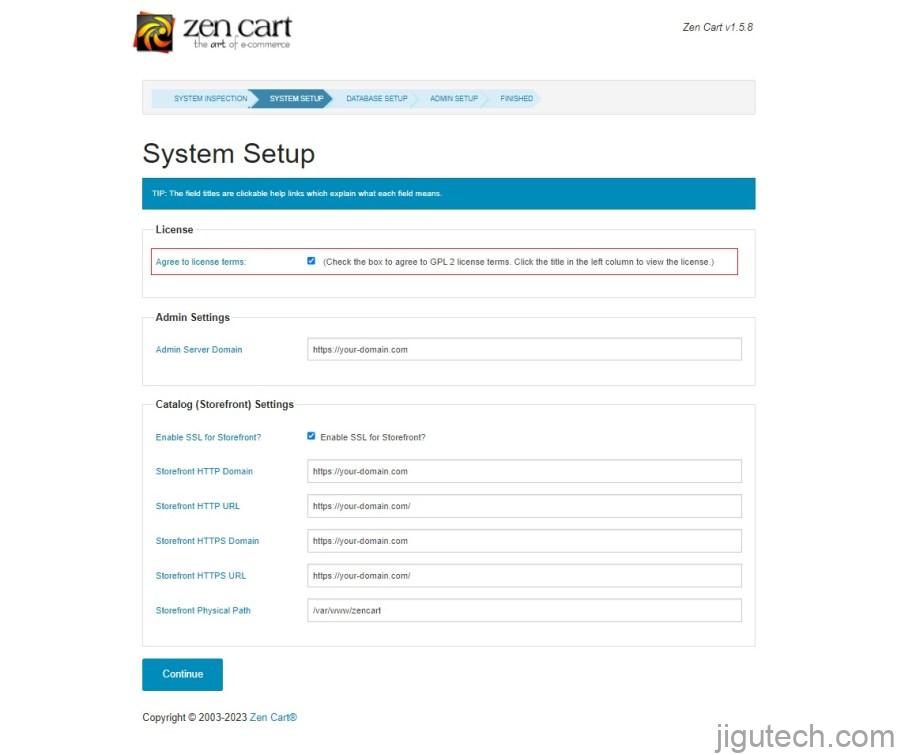
接受许可证并单击Continue。
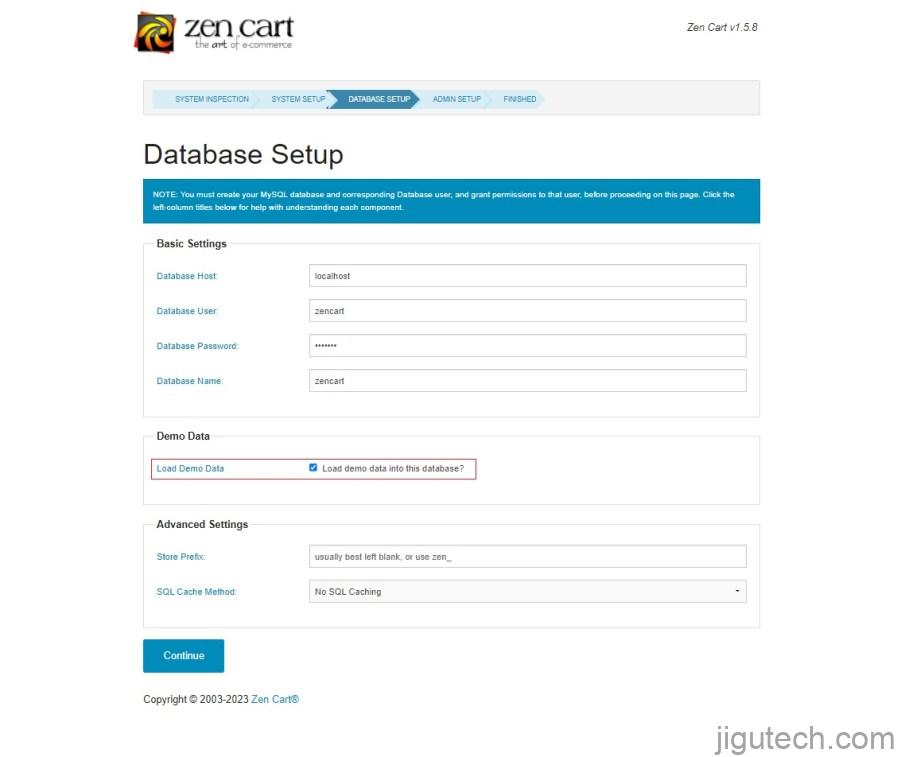
提供您的数据库信息并单击Load Demo Data选项旁边的复选框 。然后点击继续。
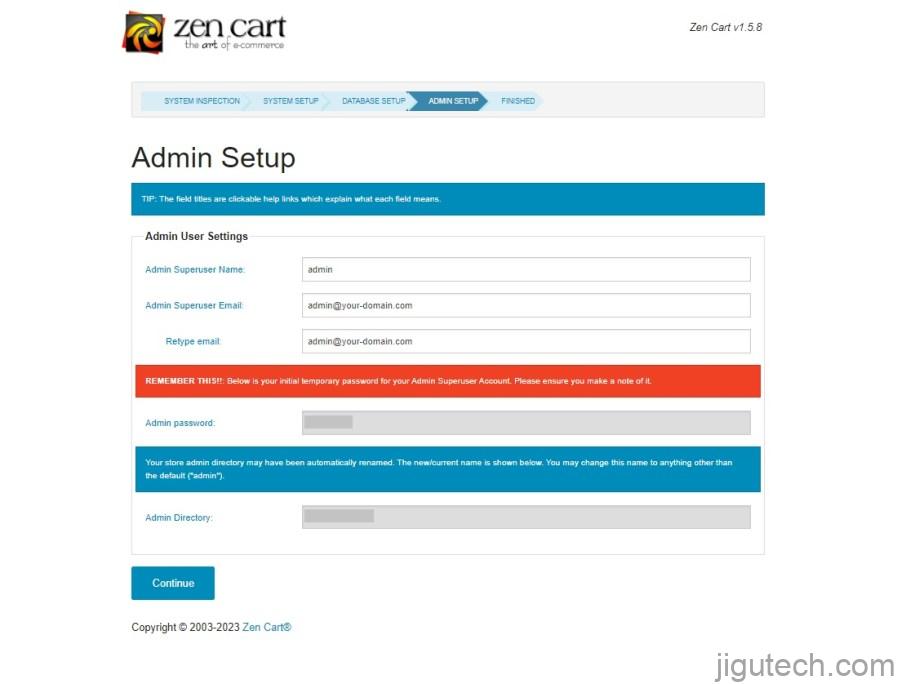
为 Zen Cart 后端的管理员建立用户名和电子邮件地址,然后单击 继续。
安装完成后,您应该会看到以下页面:
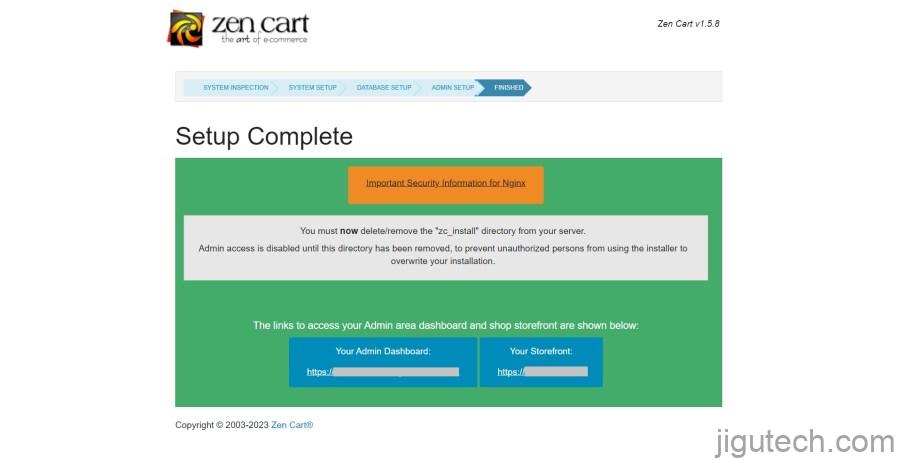
现在,打开您的终端并使用以下命令删除安装目录:
# rm -rf /var/www/zencart/zc_install/然后,如果您单击 “您的店面”, 您应该会看到您的商店页面:

或者,如果您单击 “您的管理仪表板” 按钮,您应该会看到登录页面:
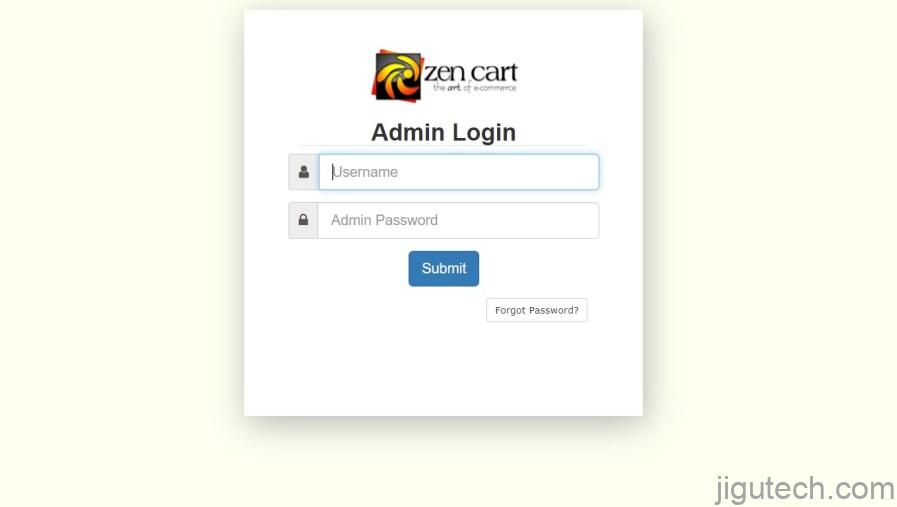
提供您的管理员用户名和密码,然后单击 “提交”按钮。你应该看到你的管理面板。
评论和结论
恭喜!您已经成功安装了 Zen Cart 电子商务平台。感谢您使用本教程在您的 Ubuntu 22.04 操作系统上安装 Zen Cart。
如需更多帮助或有用信息,我们建议您查看Zen Cart 官方网站上的文档。


